Taking pics of peeps: tips and tricks
Features
“Taking quality images of people for use on your own, as well as external, communication channels is simple with these three easy-to-remember tips,” says anglican focus Editor Michelle McDonald


Quality images make a huge difference when it comes to social media engagement, website and e-newsletter user experience, publication readership and the likelihood of a journalist to publish your media release.
With Christmas approaching, our phone cameras and DSLRs will be used even more than usual, as we take festive shots of people at our services and parish and ministry events, as well as while celebrating with loved ones.
While a professional digital camera is necessary for bigger or more formal events, especially in poor lighting when flash cannot be used (such as in the Cathedral), a quality phone camera is often sufficient.
When I started taking photographs of people in a professional environment, instead of trying to memorise everything I learned in a half-day photography course and what I had read online, I focused on three simple easy-to-remember (and therefore achievable) things. Once I had these three elements down pat, I built my photography skills from these.
Taking quality images of people for publication on your own, as well as external, communication channels is simple with these three easy-to-remember tips.
1. Ensure eyes are in the top third of people shots
The most important part of a person’s facial features in photography is the eyes. When we look at photographs, our eyes are naturally drawn to the top third of the shot, so this is the ideal place for people’s eyes to be.
Set your phone’s grid lines to help break the composition of your shot into thirds (for iPhones, go to ‘Settings’, select ‘Camera’, and then select ‘Grid’ and for Samsungs, go to ‘Settings’ and set the ‘Grid Lines’ option to ‘on’). Use the top grid line as your guide for where to place the eyes in the composition of your shot.
Most DSLRs have grid lines – in either, or both, the view finder and ‘Live View’ (via the LCD screen) options. If they don’t appear automatically, use the on-demand functions to set these.
The ‘rule of thirds’ applies whether the subject (i.e. the focus of your shot) is far away, close up or very close up.
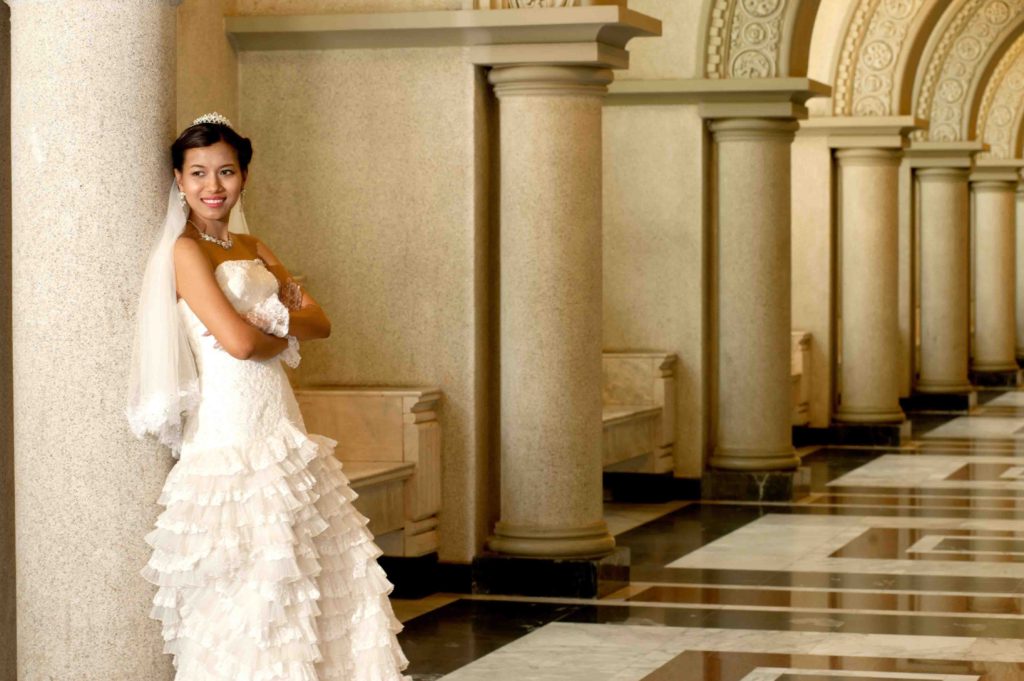
Ensure your subject’s eyes are in the top third of the shot when the shot is taken from a distance

Ensure your subject’s eyes are in the top third of the shot when the shot is taken close up

Ensure your subject’s eyes are in the top third of the shot when the shot is taken very close up
2. Ensure images are sharp
The primary reason why I (often) need to ask people to reshoot images sent to me for publication is because they are not sharp, and this is usually because the image is not in focus. To ensure images are sharp:
- Clean your phone camera or DSLR lens of lint and grime.
- Hold the phone steady or set the DSLR camera body or lens ‘image stabilisation’ or ‘vibration reduction’ to ‘on’ (or use a phone or camera tripod).
- Get closer to your subject (i.e. the focus of the shot) when using a phone, rather than zoom in.
- Submit high-resolution images (images that are at least 1 MB in file size) – this is especially essential for print publications, such as newspapers and magazines. A 25 KB image appears pixelated when inserted into online templates and a 100 KB image will appear pixelated when used in print media.
- Use your phone or camera’s functions to ensure images are in focus.
Most phones enable you to focus on a given person’s face in a frame by tapping on the screen where the face is, including with iPhones and Galaxy S10s. You can also use the ‘Portrait’ (iPhone) or ‘Live Focus’ (Samsung) function on newer phone models in order to add a depth-of-field effect so that your subject is sharp and the background slightly blurred. The ‘Portrait’ function is found between ‘Photo’ and ‘Square’ (above the white round button) on iPhones, while ‘Live Focus’ is found between ‘Pro’ and ‘Photo’ OR under the ‘More’ option (above the white round button) on Samsungs.
When using a camera, put the focal point on the subject’s eyes, rather than the shoulder or head – your camera can only focus on one point at one time. As well as half pressing the shutter-release button, DSLRs have different functions to assist with focusing, variously including spot focus in the view finder, the green squares on your ‘Live View’ and the AF (auto focus) button (sometimes called ‘back button focus’).

Ensure images taken indoors are sharp and consider using your phone’s or DSLR’s depth-of-field function to make the subject sharp and your background blurred

Ensure images taken outdoors are sharp and consider using your phone’s or DSLR’s depth-of-field function to make the subject sharp and your background blurred
3. Take (mostly) landscape-orientation images
Generally speaking, landscape-orientation images are the most versatile, as news and organisation websites, e-newsletter templates and social media channels tend to favour landscape-orientation, rather than portrait-orientation, shots. There are a few exceptions, most notably Instagram which is set up to favour portrait-orientation images for ‘Stories’.
A landscape-orientation shot is longer across the top than the sides, so take most pics by holding your phone on its side or your camera horizontally.
Most news sites (including anglican focus) and organisation sites are set up in the back end to accommodate feature images that are landscape-orientation, as this screen shot illustrates
So, next time you take images of people, remember to:
- Ensure eyes are in the top third of the shot.
- Ensure images are sharp.
- Take (mostly) landscape-orientation shots.